The following shows the main application desktop window with a single opened directory browser window and the context menu of a selected file, produced by right clicking on it:
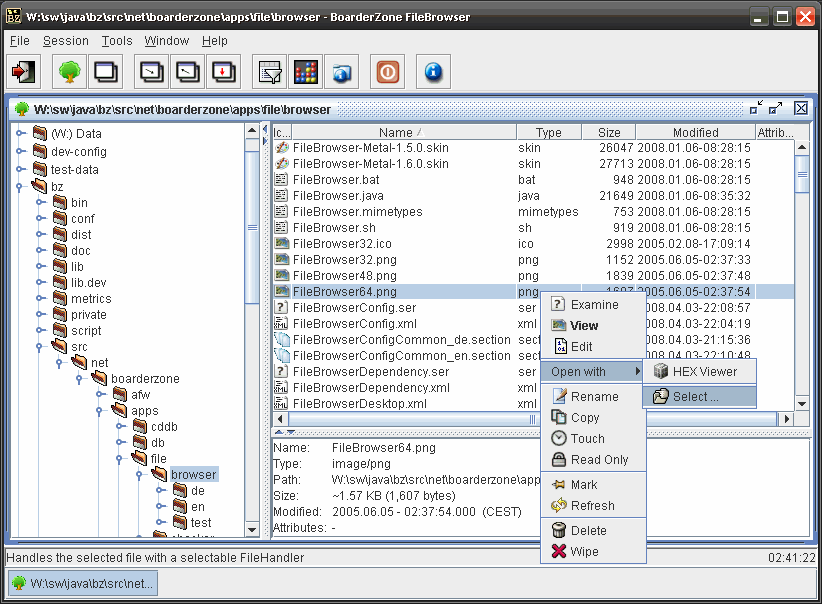
The left part of the browser provides access to the directory hierarchy, with
the top level presenting all configured directory roots. The name displayed
on the root level is provided by the underlying operating system and might
sometimes be different from the name specified in the corresponding setting
roots (in the displayed example the configured directory
root would be “
W:/
” while the text being
displayed for that tree node is “
(W:) Data
” ...).
Selecting one of the nodes in the tree at the left will display that directories contents in the right upper pane of the browser window. Only non-directory entries will be displayed there however (e.g. files, links, or whatever other types of file system entries are possible on a given platform). The displayed information in that area is what the file system provides along with hints as to what FileHandler will be used for a specific file, e.g. the FileHandlers icon.
The columns of the table in that area can be rearranged by clicking and dragging a table header cell. That setup will be remembered when closing a browser window and reused for new ones after that.
Clicking on a column header of the file information pane will sort the files according to the information in that column, first ascending then descending (when clicked again).
Double clicking on the separator of two columns in the table header row will adjust the column to the left of the clicked separator such that it only uses as much space as necessary to display all the information without truncating it.
The right lower part at last provides detailed information about the currently selected file or directory. This is basically the same information displayed in the table but in a more verbose form. Actually it is provided by the only FileHandler that is guaranteed to always be available, the embedded File Info Viewer. That handler is also used for handling a file if no other handler is configured for a given file type.
Right clicking on either a file in the table or a directory in the tree will display a popup menu listing the available operations on that item. In case of a file, the default action used upon double click is displayed in bold font. The screenshot above shows the menu with expanded submenu which shows the additional entry 'Select ...' which only appears when pressing SHIFT when right clicking. The default configuration should be such that manual selection of the FileHandler to choose should not be necessary normally.
The popup menus for files and directories differ slightly as the following image of the menu on a directory in the tree shows:
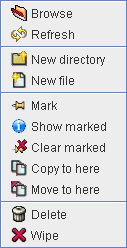
Following is a description of the actions in each of those menus and the differences when executed on a file or a directory:
Table 2.1. Directory and File actions
| Dir | File | Command | Hot key | Description |
|---|---|---|---|---|
| yes | no | N/A | Browse |
Opens a new directory browser window with the selected directory as its sole root of the tree, thus allowing only navigation below that directory. |
| yes | yes | F5 | Refresh |
Refreshes the information of the selected item. In case of a directory will validate its child nodes in the tree as well as update the table of contained files. In case of a file will just update the row of that file and the corresponding detail information. |
| yes | no | Insert | New Directory |
Creates a new sub-directory of the selected directory. Queries for the name of the new directory before attempting to create it. |
| yes | no | CTRL-Insert | New File |
Creates a new empty file in the selected directory with zero bytes. Queries for the name of the new file before attempting to create it. The name assigned to that new file (or rather its extension) will determine the supported operations on the new file (resp. what FileHandlers will consider themselves capable of dealing with it). Depending on the FileHandler, such an empty file might not be supported and will lead to an error message when attempting to open the new file with that handler. |
| yes | no | SHIFT-Insert | New File from Clipboard |
Creates a new file in the selected directory with the current contents of the system clipboard. Shows a dialog to select which format to choose from the available data in the clipboard. After that queries for the name of the new file, before attempting to create it. In case of image data, the extension will determine the format in which the image data is written to that new file. Known supported formats are .png, .jpg and .bmp (the last one at least under Windows). This list may vary, depending on the configuration of the Java Runtime Environment. |
| yes | no | CTRL-SHIFT-Insert | New File from Template |
Creates a new file from a selected template. Displays a dialog to select the template, queries for the name of the new file and finally attempts to create that new file in the selected directory. |
| yes | yes | CTRL-C | Mark |
Marks the selected file or directory for subsequent operations. These might be “Copy to here” or others, as described below. The marked file name will be available in all directory browsers of the same application instance. |
| yes | no | N/A | Show marked |
Displays the File Info Viewer on the marked file or directory name. Can be used to verify the correct file is marked before attempting some other operation on it. |
| yes | no | N/A | Clear marked |
Resets the marked file name to empty, e.g. no file is marked afterwards. Can be used to prevent accidential operations on a marked file after performing the desired operations. |
| yes | no | CTRL-V | Copy to here |
Copies the marked file or directory so that it will be a direct child of the selected directory. Will do this recursively in case the marked file name specifies a directory. After copying the marked file is the same as before. |
| yes | no | N/A | Move to here |
Moves the marked file or directory so that it will be a direct child of the selected directory. Will do this recursively in case the marked file name specifies a directory. Will reset the file name mark after successful completion. Works even if the source and target are on different file system, e.g. in that case the contents are first copied and then removed from the source (on a file by file basis). |
| yes | yes | Delete | Delete |
Deletes the selected item from the file system. Operates recursively in case of a directory. This simply performs a file system deletion, the thus deleted files might therefore be recovered by dedicated tools. |
| yes | yes | SHIFT-Delete | Wipe |
Overwrites the selected item with random content and afterwards deletes the corresponding file system entry. Operates recursively in case of a directory. Can be used to prevent information in thus deleted files from being recovered by dedicated tools. Note: This functionality makes use of the standard Java java.io.RandomAccessFile which is documented to provide mechanisms to ensure data gets actually written to disk if demanded, neglecting any caching mechanisms of the underlying file or operating system. This should provide reasonable security in most cases but might not be appropriate in all situations. |
| no | yes | (SHIFT-)Enter | Open ... |
Opens the selected file with a FileHandler using the indicated operation (such as “View” or “Edit”). This will open a new window which provides the FileHandlers user interface to act on the contents of the selected file. Further information about the possibilities should be taken from the selected FileHandlers documentation. Activating this command through the hotkey “Enter” will open the file with the default FileHandler, while using “SHIFT-Enter” will present a dialog to select the FileHandler to use. |
| (yes) | yes | F2 | Rename |
Queries for a new name of the selected item and attempts to rename the corresponding file system entry. Will complain if the new name is invalid or already in use. For directories in the tree, this command is not listed in the popup menu but only available through its hotkey. |
| no | yes | SHIFT-C | Copy |
Queries for a new file name and copies the selected file to a file with that new name, e.g. creates a copy of the selected file under a new name in the same directory. |
| no | yes | CTRL-T | Touch |
Sets the last modification time of the selected file to the current system time. |
| no | yes | CTRL-R | Read Only |
Sets the selected files read-only bit to true. Cannot be undone as Java provides no way to reset the read-only status of an existing file. The only way to turn a read-only file into a modifiable file is to create a copy of the original file (see above) manually. Copying will not copy the read-only flag. |